This page is under construction!!! You can find the last edited time on the left.
For average users, you should follow the guide here ayn-odin2
¶ 0. WARNINGS
This wiki page is intended for experienced Linux users who wish to configure their system themselves!
We only provide a demonstration of Arch Linux installation here. You may need to adapt this example for the installation of other Linux distributions.
If you are interested in understanding how Linux works on this machine, reading this wiki page may be helpful.
¶ 1. Preparation
¶ 1.1 Preparing workspace
¶ 1.1.1 Creating workspace directory
This article assumes that you are working in a folder named
odin2in your home directory
mkdir -p ~/odin2
¶ 1.1.2 Installing necessary packages
sudo pacman -Syyu --needed base-devel aarch64-linux-gnu-gcc aarch64-linux-gnu-binutils android-tools \
                                    arch-install-scripts bc cpio dtc gettext git gparted graphviz imagemagick libelf pahole \
                  parted perl python qemu-user-static-binfmt tar usbutils xz python-sphinx texlive-latexextra
edlcould be manually installed from bkerler/edl
yay -Sy edl-git
¶ 1.1.3 Downloading useful files
Download xbl_s_devprg_ns.melf to ~/odin2/
Download redmagic-abl.elf to ~/odin2/
¶ 1.1.4 Installing Magisk on Odin 2
Download and install Magisk APK
Then enable ADB access in the Developer Menu, and connect Odin 2 to your PC.
After that, reboot Odin 2 to EDL mode using the following command:
adb reboot edl
Confirm that the device is detected in lsusb:
ID 05c6:9008 Qualcomm, Inc. Gobi Wireless Modem (QDL mode)
Backup/dump specific partitions using edl:
mkdir ~/odin2/backup
cd ~/odin2
edl --loader=xbl_s_devprg_ns.melf --memory=ufs r init_boot_a backup/init_boot_a.img
edl --loader=xbl_s_devprg_ns.melf --memory=ufs r boot_a backup/boot_a.img
edl --loader=xbl_s_devprg_ns.melf --memory=ufs r abl_a backup/abl_a.img
edl --loader=xbl_s_devprg_ns.melf --memory=ufs r dtbo_a backup/dtbo_a.img
You need to determine the current slot containing the latest installation of Android!
Useinit_boot_b,boot_b,abl_banddtbo_babove for slot B.
Read B. What are Android A/B slots? for details
Then flash the REDMAGIC abl(which contains a better fastboot):
edl --loader=xbl_s_devprg_ns.melf --memory=ufs w abl_a redmagic-abl.elf
edl --loader=xbl_s_devprg_ns.melf --memory=ufs w abl_b redmagic-abl.elf
Finally, reset the device to boot into Android:
edl reset
Copy backup/init_boot_a.img to a location within the Android internal storage. Then, use Magisk to patch it. This will generate a file called magisk-patched-xxxxxxx.img.
Copy the patched file to your PC, then reboot Odin 2 to fastboot mode:
adb reboot bootloader
Use fastboot to flash the patched file:
fastboot flash init_boot_a magisk-patched-xxxxxxx.img # Check A/B slots!
fastboot reboot
Congratulations! Your Odin 2 should now have root permissions.
¶ 1.2 Pulling required files from Android
¶ 1.2.1 Device tree (Optional)
adb shell su -c cp /sys/firmware/fdt /sdcard/Download/
adb pull /sdcard/Download/fdt ~/odin2/odin2-android.dtb
dtc -I dtb -O dts ~/odin2/odin2-android.dtb -o ~/odin2/odin2-android.dts
¶ 1.2.2 Firmware
mkdir -p ~/odin2/firmware
adb shell mkdir -p /sdcard/Download/firmware
adb shell su -c cp -r /vendor/bt_firmware/image /sdcard/Download/firmware/bt_firmware
adb shell su -c cp -r /vendor/firmware /sdcard/Download/firmware/firmware
adb shell su -c cp -r /vendor/firmware_mnt/image /sdcard/Download/firmware/firmware_mnt
adb pull /sdcard/Download/firmware ~/odin2/firmware_orig
¶ 1.3 Preparing Linux kernel
¶ 1.3.1 Building Linux kernel
You have the option to use a prebuilt kernel or build the kernel yourself.
¶ 1.3.1.1 Using prebuilt kernel
Download the prebuilt kernel from the following link:
No, prebuilt kernel doesn’t exist for now. But you can still get useful stuff from the link.
https://github.com/edk2-porting/linux-next/releases/tag/odin2-release
¶ 1.3.1.2 Building kernel from source
Clone the kernel source tree from Github:
cd ~/odin2
git clone https://github.com/edk2-porting/linux-next.git -b integration/ayn-odin2
Build the kernel:
cd linux-next
ARCH=arm64 CROSS_COMPILE=aarch64-linux-gnu- make odin2_defconfig
ARCH=arm64 CROSS_COMPILE=aarch64-linux-gnu- make -j$(nproc)
If there are no errors, you will have the compiled kernel and device tree files:
arch/arm64/boot/Image.gz
arch/arm64/boot/dts/qcom/qcs8550-ayn-odin2-hypdtbo.dtb
¶ 1.4 anything here?
ha
¶ 2. Installation
¶ 2.1 Partitioning internal UFS storage (Optional)
You will lose all your data in Android, as if you performed a factory reset!
You can skip this step by installing the rootfs on a microSD card.
However, please note that microSD cards are usually 100x slower than UFS!
Reboot Odin 2 into fastboot mode and check the current slot for Android:
adb reboot bootloader
fastboot getvar current-slot
If the current slot is A, switch to slot B, and vice versa.
fastboot set_active b
Erase partitions that will prevent Linux from booting properly:
fastboot erase dtbo_b
fastboot erase init_boot_b
Boot into mass storage mode:
fastboot boot msd.img-odin2
You’ll have to erase
dtboandinit_bootfor now in order to boot into mass storage mode! Make sure you have backup!
Confirm that the device is detected using sudo dmesg | tail -n 150:
...
[14671.505850] usb 2-1: new SuperSpeed Plus Gen 2x1 USB device number 13 using xhci_hcd
[14671.523933] usb 2-1: New USB device found, idVendor=05f9, idProduct=1234, bcdDevice= 6.06
[14671.523946] usb 2-1: New USB device strings: Mfr=1, Product=2, SerialNumber=3
[14671.523950] usb 2-1: Product: Mass Storage
[14671.523953] usb 2-1: Manufacturer: Linux
[14671.523957] usb 2-1: SerialNumber: 1234567890
...
If the device does not appear, try unplugging and plugging the cable again, or use a Type-A to Type-C cable.
Open GParted and locate the disk containing the userdata partition
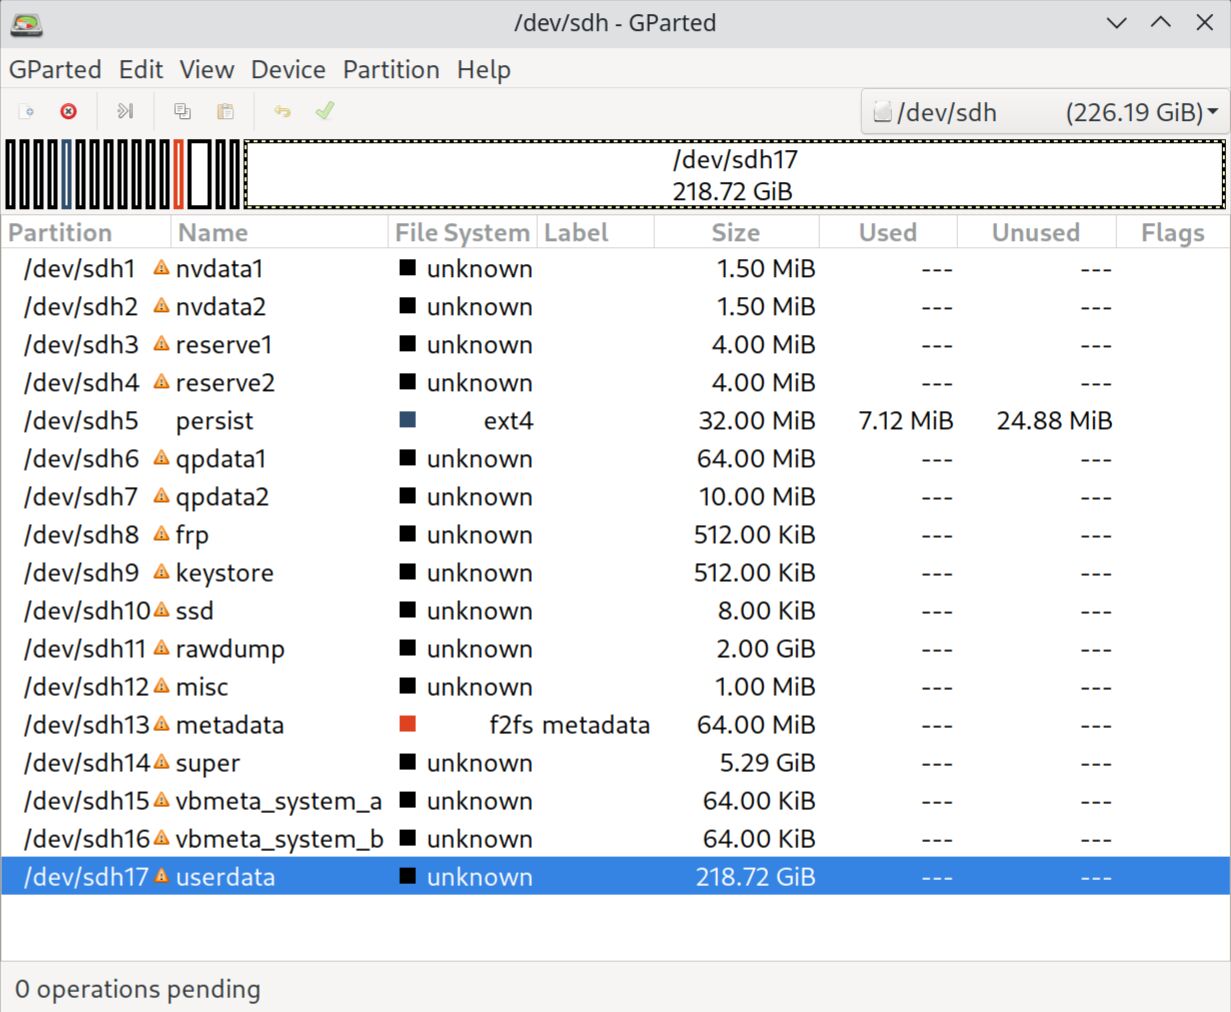
In this example, the partition is /dev/sdh17.
Now, return to the terminal. We are going to resize the userdata partition using parted.
$ sudo parted /dev/sdh
GNU Parted 3.6
Using /dev/sdh
Welcome to GNU Parted! Type 'help' to view a list of commands.
(parted) print
Model: Qualcomm sda (scsi)
Disk /dev/sdh: 243GB
Sector size (logical/physical): 4096B/4096B
Partition Table: gpt
Disk Flags:
Number Start End Size File system Name Flags
1 24.6kB 1597kB 1573kB nvdata1
2 1597kB 3170kB 1573kB nvdata2
3 3170kB 7365kB 4194kB reserve1
4 7365kB 11.6MB 4194kB reserve2
5 11.6MB 45.1MB 33.6MB ext4 persist
6 45.1MB 112MB 67.1MB qpdata1
7 112MB 123MB 10.5MB qpdata2
8 123MB 123MB 524kB frp
9 123MB 124MB 524kB keystore
10 124MB 124MB 8192B ssd
11 124MB 2271MB 2147MB rawdump
12 2271MB 2272MB 1049kB misc
13 2272MB 2339MB 67.1MB metadata
14 2339MB 8019MB 5680MB super
15 8019MB 8019MB 65.5kB vbmeta_system_a
16 8019MB 8019MB 65.5kB vbmeta_system_b
17 8019MB 243GB 235GB userdata
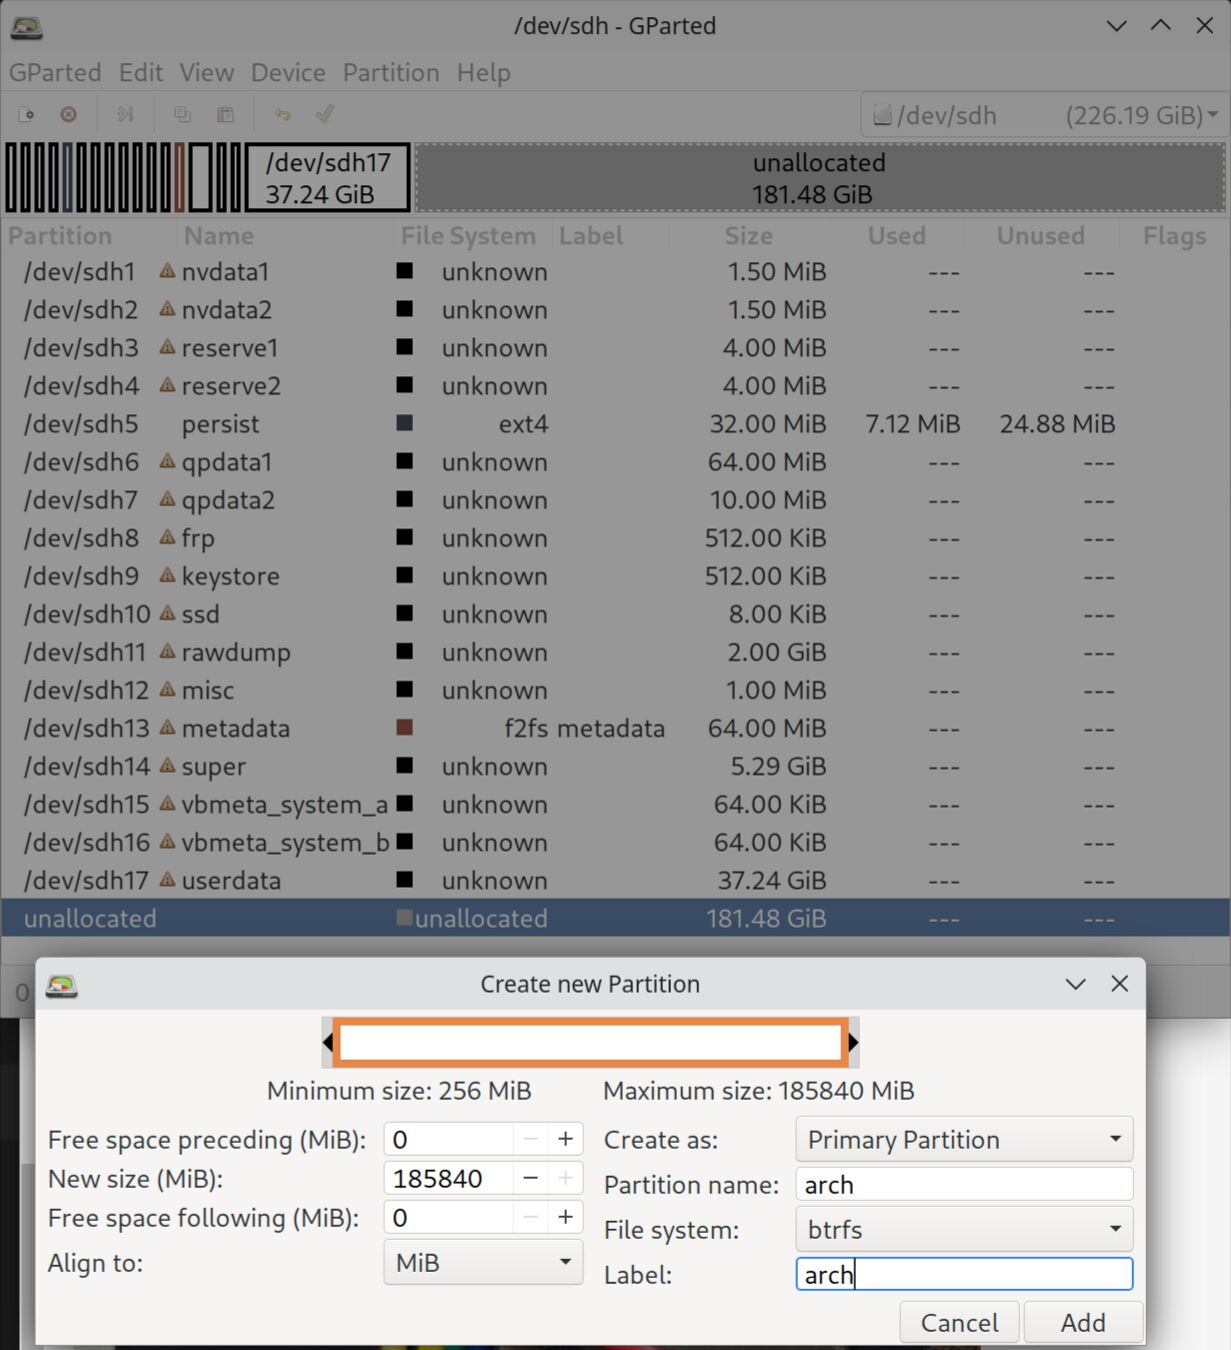
(parted) resizepart 17
End? [243GB]? 48GB # Here I resized userdata partition to 40GB, as it starts at 8019MB and ends at 48GB
Warning: Shrinking a partition can cause data loss, are you sure you want to continue?
Yes/No? Yes
(parted) quit
Now, return to GParted, click “GParted” -> “Refresh Devices”, and you’ll see the free space after the userdata partition.
Click on the unallocated space, right-click, select “New”, set “Partition name” and “Label” to arch, set “File system” to btrfs, click “Add”, and then click “✅ Apply All Operations”
Now, reboot Odin 2 to fastboot mode by long-pressing power + volume down keys. In fastboot mode, erase the userdata partition and reboot to Android:
fastboot erase userdata
fastboot reboot
¶ 2.2 Preparing firmware for mainline Linux usage
Firstly, obtain the required tools:
cd ~/odin2
mkdir -p git firmware/qca firmware/qcom/sm8550/ayn/odin2
git clone https://github.com/andersson/pil-squasher git/pil-squasher
make -C git/pil-squasher
git clone https://github.com/qca/qca-swiss-army-knife git/qca-swiss-army-knife
¶ 2.2.1 DSP/GPU/bluetooth firmware
cd ~/odin2/firmware/qcom/sm8550/ayn/odin2
~/odin2/git/pil-squasher/pil-squasher adsp.mbn ~/odin2/firmware_orig/firmware_mnt/adsp.mdt
~/odin2/git/pil-squasher/pil-squasher adsp_dtb.mbn ~/odin2/firmware_orig/firmware_mnt/adsp_dtb.mdt
~/odin2/git/pil-squasher/pil-squasher cdsp.mbn ~/odin2/firmware_orig/firmware_mnt/cdsp.mdt
~/odin2/git/pil-squasher/pil-squasher cdsp_dtb.mbn ~/odin2/firmware_orig/firmware_mnt/cdsp_dtb.mdt
cp ~/odin2/firmware_orig/firmware_mnt/*.jsn ./
cp ~/odin2/firmware_orig/firmware/a740_zap.mbn ./
cp ~/odin2/firmware_orig/firmware/gmu_gen70200.bin ~/odin2/firmware/qcom/
cp ~/odin2/firmware_orig/firmware/a740_sqe.fw ~/odin2/firmware/qcom/
cp ~/odin2/firmware_orig/bt_firmware/hmtbtfw20.tlv ~/odin2/firmware/qca/
cp ~/odin2/firmware_orig/bt_firmware/hmtnv20.bin ~/odin2/firmware/qca/
¶ 2.2.2 Wi-Fi firmware
mkdir -p ~/odin2/firmware/ath12k/WCN7850/hw2.0
cp ~/odin2/firmware_orig/firmware_mnt/kiwi/phy_ucode20.elf ~/odin2/firmware/ath12k/WCN7850/hw2.0/m3.bin
cp ~/odin2/firmware_orig/firmware_mnt/kiwi/regdb.bin ~/odin2/firmware/ath12k/WCN7850/hw2.0/regdb.bin
cp ~/odin2/firmware_orig/firmware_mnt/kiwi/amss20.bin ~/odin2/firmware/ath12k/WCN7850/hw2.0/amss.bin
Next, create a new file called board-2.json under ~/odin2/firmware_orig/firmware_mnt/kiwi/:
[
    {
        "board": [
            {
                "names": [
                    "bus=pci,vendor=17cb,device=1107,subsystem-vendor=17cb,subsystem-device=1107,qmi-chip-id=2,qmi-board-id=255",
                    "bus=pci,qmi-chip-id=2,qmi-board-id=255"
                ],
                "data": "bdwlan.elf"
            }
        ],
        "regdb": [
            {
                "names": [
                    "bus=pci,vendor=17cb,device=1107,subsystem-vendor=17cb,subsystem-device=1107,qmi-chip-id=2,qmi-board-id=255",
                    "bus=pci,qmi-chip-id=2,qmi-board-id=255"
                ],
                "data": "regdb.bin"
            }
        ]
    }
]
Finally, use the ath12k-bdencoder tool to create the board-2.bin file
cd ~/odin2/firmware_orig/firmware_mnt/kiwi
~/odin2/git/qca-swiss-army-knife/tools/scripts/ath12k/ath12k-bdencoder -c board-2.json
cp ~/odin2/firmware_orig/firmware_mnt/kiwi/board-2.bin ~/odin2/firmware/ath12k/WCN7850/hw2.0/board-2.bin
¶ 2.3 Deploying Arch Linux ARM
¶ 2.3.1 Installing base system
-
Download the latest tarball: http://os.archlinuxarm.org/os/ArchLinuxARM-aarch64-latest.tar.gz
-
Boot Odin 2 into mass storage mode
-
Extract the tarball as the root user using
bsdtarto preserve extended attributes and ACLs
sudo -s
mount /dev/disk/by-partlabel/arch /mnt
bsdtar -xpf ArchLinuxARM-aarch64-latest.tar.gz -C /mnt
- Chroot into the Arch Linux ARM system
You’ll need
qemu-user-static-binfmtandarch-install-scriptspackages for this to work!
genfstab -L /mnt >> /mnt/etc/fstab
arch-chroot /mnt
- Set the time zone:
ln -sf /usr/share/zoneinfo/Region/City /etc/localtime
- Localization:
Edit /etc/locale.gen and uncomment en_US.UTF-8 UTF-8 and other needed UTF-8 locales.
Generate the locales by running:
locale-gen
Create the locale.conf file, and set the LANG variable accordingly:
/etc/locale.conf

LANG=en_US.UTF-8
- Configure
pacman
Open /etc/pacman.conf and uncomment ParallelDownloads
# Misc options
#UseSyslog
#Color
#NoProgressBar
CheckSpace
#VerbosePkgLists
ParallelDownloads = 10
- Configure
mkinitcpio
Open /etc/mkinitcpio.conf and uncomment zstd compression
# COMPRESSION
# Use this to compress the initramfs image. By default, gzip compression
# is used. Use 'cat' to create an uncompressed image.
COMPRESSION="zstd"
#COMPRESSION="gzip"
Open /etc/mkinitcpio.d/linux-aarch64.preset and disable the fallback preset
PRESETS=('default')
- Initialize the pacman keyring and populate the Arch Linux ARM package signing keys
pacman-key --init
pacman-key --populate archlinuxarm
- Create the hostname file:
/etc/hostname

ayn-odin2
- Fully upgrade the system
pacman -Syy archlinux-keyring
pacman -Syu btrfs-progs
- Install GNOME desktop environment and useful packages
pacman -S base-devel gnome git firefox chromium dolphin gedit wireless-regdb clang compiler-rt
hostnamectl chassis handset
Or install KDE Plasma
pacman -S base-devel plasma-meta git firefox chromium dolphin gedit wireless-regdb clang compiler-rt
hostnamectl chassis handset
- Enable services
systemctl enable gdm # if using GNOME
systemctl enable sddm # if using KDE
systemctl disable systemd-networkd
systemctl enable NetworkManager
¶ 2.3.2 Configuring Mesa Zink
Mesa does not currently support OpenGL for the Adreno 740 GPU. Therefore, we need to install the latest version of Mesa and configure
zinkas an OpenGL to Vulkan translation layer to make desktop environment work.
Firstly, download the latest mesa from https://github.com/edk2-porting/linux-next/releases/tag/odin2-release
Install the package:
# make sure you are in the chroot environment
pacman -U mesa-git-24.0.0_devel.179592.ce5475366e9.d41d8cd-1-aarch64.pkg.tar.xz
Modify system environment variables:
/etc/environment

#
# This file is parsed by pam_env module
#
# Syntax: simple "KEY=VAL" pairs on separate lines
#

__GLX_VENDOR_LIBRARY_NAME=mesa
MESA_LOADER_DRIVER_OVERRIDE=zink
GALLIUM_DRIVER=zink
¶ 2.3.3 Installing firmware and Qualcomm services
Exit from the chroot environment first:
exit
Copy the firmware files to the target system:
cp -r /home/USERNAME/odin2/firmware/* /mnt/lib/firmware/
Go back to the chroot environment:
arch-chroot /mnt
Modify /etc/mkinitcpio.conf to include the firmware files
# FILES
# This setting is similar to BINARIES above, however, files are added
# as-is and are not parsed in any way.  This is useful for config files.
FILES=(
        /lib/firmware/qcom/sm8550/ayn/odin2/adsp.mbn
        /lib/firmware/qcom/sm8550/ayn/odin2/adsp_dtb.mbn
        /lib/firmware/qcom/sm8550/ayn/odin2/cdsp.mbn
        /lib/firmware/qcom/sm8550/ayn/odin2/cdsp_dtb.mbn

        /lib/firmware/ath12k/WCN7850/hw2.0/amss.bin
        /lib/firmware/ath12k/WCN7850/hw2.0/regdb.bin
        /lib/firmware/ath12k/WCN7850/hw2.0/board-2.bin
        /lib/firmware/ath12k/WCN7850/hw2.0/m3.bin
        /lib/firmware/qca/hmtbtfw20.tlv
        /lib/firmware/qca/hmtnv20.bin

        /lib/firmware/qcom/sm8550/ayn/odin2/a740_zap.mbn
        /lib/firmware/qcom/gmu_gen70200.bin
        /lib/firmware/qcom/a740_sqe.fw

        /lib/firmware/regulatory.db.p7s
        /lib/firmware/regulatory.db
        )
Re-generate the initramfs:
mkinitcpio -P
Copy the initramfs to your PC:
exit # Exit from the chroot environment
cp /mnt/boot/initramfs-linux.img /home/USERNAME/odin2/
chmod a+rw /home/USERNAME/odin2/initramfs-linux.img
arch-chroot /mnt
Clone the source code of Qualcomm services:
cd
git clone https://github.com/andersson/qrtr.git
git clone https://github.com/andersson/pd-mapper.git
git clone https://github.com/andersson/tqftpserv.git
Build and install them:
pushd qrtr && make prefix=/usr && make prefix=/usr install && systemctl enable qrtr-ns && popd
pushd pd-mapper && make prefix=/usr && make prefix=/usr install && systemctl enable pd-mapper && popd
pushd tqftpserv && make prefix=/usr && make prefix=/usr install && systemctl enable tqftpserv && popd
Exit from the chroot environment:
exit
umount /mnt
sync
¶ 2.4 Boot into Arch Linux ARM!
Reboot Odin 2 into fastboot mode and check the current slot for Android:
fastboot getvar current-slot
If the current slot is A, switch to slot B, and vice versa.
fastboot set_active b
Erase partitions that will prevent Linux from booting properly:
fastboot erase dtbo_b
fastboot erase init_boot_b
Create the boot image:
cp ~/odin2/linux-next/arch/arm64/boot/Image.gz ./
cp ~/odin2/linux-next/arch/arm64/boot/dts/qcom/qcs8550-ayn-odin2-hypdtbo.dtb ./
cat Image.gz qcs8550-ayn-odin2-hypdtbo.dtb > Image.gz-dtb

mkbootimg \
--kernel Image.gz-dtb \
--ramdisk ~/odin2/initramfs-linux.img \
--cmdline "clk_ignore_unused pd_ignore_unused panic=30 audit=0 loglevel=8 allow_mismatched_32bit_el0 root=PARTLABEL=arch rw rootfstype=btrfs drm.debug=0x100 mem_sleep_default=s2idle" \
--kernel_offset 0x8000 \
--ramdisk_offset 0x1000000 \
--tags_offset 0x100 \
--header_version 1 \
--os_version 13.0.0 \
--os_patch_level 2023-05 \
-o test.img-odin2
Boot directly into Arch Linux:
fastboot boot test.img-odin2
Alternatively, flash the kernel into slot B:
fastboot flash boot_b test.img-odin2
fastboot reboot
¶ 0xFF FAQ & Troubleshooting
¶ A. How to reboot to EDL mode (9008)
A. In Android, reboot using adb: adb reboot edl
B. In fastboot, select Reboot to emergency mode(stock abl) or Boot to edload(REDMAGIC abl)
C. short BOOT and SD_1P8 on the back side of the motherboard
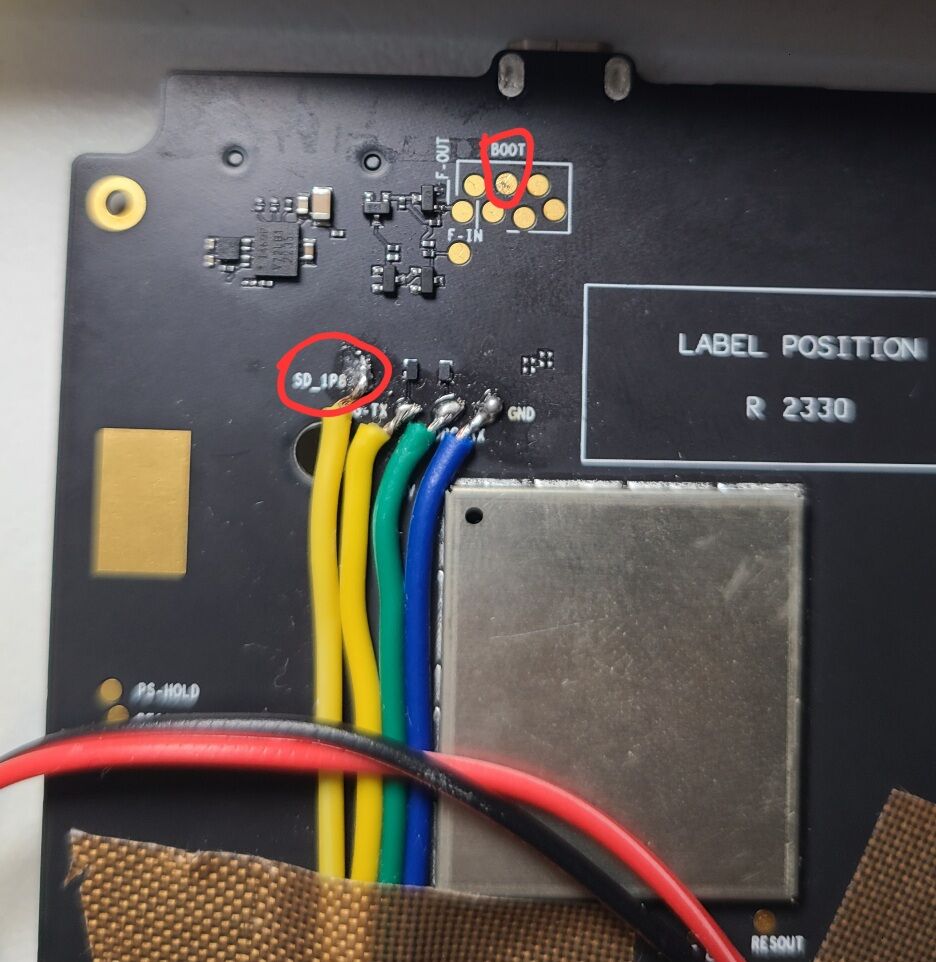
D. Press Volume up + Volume down when booting. (stock abl only)
¶ B. What are Android A/B slots?
You may want to read these articles first.
On Odin 2, each slot contains the following partitions:
abl aop aop_config bluetooth boot cpucp devcfg dsp dtbo featenabler hyp imagefv init_boot keymaster mdtp mdtpsecapp modem multiimgoem multiimgqti qupfw qweslicstore recovery rticmpdata shrm tz uefi uefisecapp vbmeta vbmeta_system vendor_boot vm-bootsys xbl xbl_config xbl_ramdump
You can easily determine the current slot in fastboot with this command:
fastboot getvar current-slot
Assuming you are in slot A when performing an Android system update, the system will update certain partitions in slot B. (eg., boot_b, init_boot_b).
If you have a Linux kernel installed in slot B, the updating process will overwrite the kernel.
Therefore, you need to back up the Linux kernel image (boot_b partition) before performing an Android update.
TODO: more elegant solution?
¶ C. How to make a full firmware backup?
You can accomplish this by using bkerler/edl
edl --loader=xbl_s_devprg_ns.melf rl . --memory=ufs --skip=userdata,rawdump,logdump --genxml
This command will skip three partitions during the backup process: userdata, rawdump, logdump.
If you have additional partitions that do not require backup, such as a Linux installation, you can add those partitions to the command as well.